
Build your Angular App Once, Deploy Anywhere
Want to build your Angular app once and deploy anywhere? Learn why compile-time configuration isn't enough and how we can load configuration at run-time.
Originally posted on InDepth Dev here. Header image by InDepth Dev.
We’re building an Angular application and when we merge new code into the master branch of our git repo, we want our build tool (like Jenkins) to grab the latest code and build our deployment package for us. With our deployment package built (A.K.A the dist folder), we want to head over to our deployment tool (like Octopus), select an environment to which we want to deploy our app, click a "deploy" button, and trust it to deploy our package, replacing our environment variables in a config file with values specific to the selected environment.
What We Need to Achieve This
We need a configuration file that we can access from our Angular code at runtime — which means it has to exist in the dist folder we intend to deploy. We need it there because we want to configure our deployment tool to replace the values of the environment variables within with values specific to the environment we deploy to.
Why Angular’s Environment Files Are Not The Solution
Let’s say we are using the environment files for our configuration as described here. If we run ng build and look inside of the dist folder, we do not see any of the environment files there. Because this is a compile-time solution, the configuration settings in the environment files are pulled into the minified JS bundles in the dist folder. We cannot easily configure our build tool to edit our environment variables if we cannot point it toward a file to edit. In short, this does not work with the "build once, deploy anywhere" model. To do this, our app needs to resolve configuration data at runtime instead of compile time.
How to Get it Done
Luckily, there is a rather quick solution. All we have to do is:
- Add a JSON configuration file in the src folder
- Update our angular/webpack configuration to include the file in our dist folder
- Add a simple configuration service with a call to get our config data from our config file
- Use APP_INITIALIZER to invoke the method retrieving our config data during the bootstrap process
Side note: Placing our configuration in a JSON file makes configuring our deployment tool easier because many of them (like Octopus) have native support for replacing values in JSON files.
Adding the config file
There isn’t much to this step. We’re simply going to add a file named app-config.json and populate it with the following JSON.
{
    "api" : "http://localhost:5000/"
}
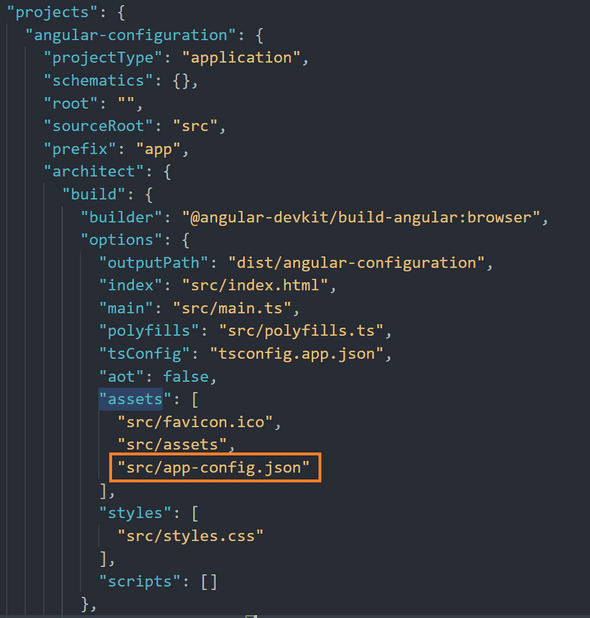
Ensuring the config file is copied to the dist folder
To achieve this, we need to make an addition to the webpack configuration in the angular.json file. We need to add the path to our config file to the assets array in the webpack build configuration.
Building the service
This is a simple service with a private property and two methods — one that sets the property and another that exposes the config data for the rest of your app. We can type the config object with an interface to help ensure we get what we expect from the JSON config file.
@Injectable({
    providedIn: 'root'
})
export class ConfigService {
    private configuration: AppConfig;

    constructor(private httpClient: HttpClient) {}

    setConfig(): Promise<AppConfig> {
        return this.httpClient
            .get<AppConfig>('./app-config.json')
            .toPromise()
            .then((config) => (this.configuration = config));
    }

    readConfig(): AppConfig {
        return this.configuration;
    }
}
Notice that the setConfigData method returns a promise? The initialization of our app will not complete until all promises are resolved so by returning a promise here, we're ensuring that the config data will be available when the rest of our app loads up and needs to use it.
Let’s take a look
With that in place, let’s set up the APP_INITIALIZER. According to the docs, APP_INITIALIZER is an injection token that allows us to invoke functions during the bootstrapping process of our application. To do that, we add the ConfigService and APP_INITIALIZER token as providers in app.module.ts.
const appInitializerFn = (configService: ConfigService) => {
    return () => {
        return configService.setConfig();
    };
};

@NgModule({
    declarations: [AppComponent],
    imports: [BrowserModule, AppRoutingModule, HttpClientModule],
    providers: [
        ConfigService,
        {
            provide: APP_INITIALIZER,
            useFactory: appInitializerFn,
            multi: true,
            deps: [ConfigService]
        }
    ],
    bootstrap: [AppComponent]
})
export class AppModule {}
Note that we need to use a factory function to create an instance of our ConfigService and call the setConfig method on it.
Now, to ensure that this worked as expected, we can inject our ConfigService into the AppComponent and call our readConfig method to get the config object.
@Component({
    selector: 'app-root',
    templateUrl: './app.component.html',
    styleUrls: ['./app.component.scss']
})
export class AppComponent implements OnInit {
    config: AppConfig;

    constructor(private configService: ConfigService) {}

    ngOnInit(): void {
        this.config = this.configService.readConfig();
    }
}
In our app.component.html file, we will just remove all of the default boilerplate HTML and add the following to display our config data.
If we run our app locally with ng serve, we will see our JSON configuration object rendered on the webpage.
<div>{{ config | json }}</div>
To see a working example, take a look at the Github Repo.
Drawbacks to this approach
There are a few drawbacks we should be aware of when taking this approach. Because we're loading our configuration data as a provider in our AppModule, we do not have access to it until after our app is bootstrapped. In other words, our configuration data will be there for use in our application as we saw above, but it will not be available if we need it in order to load a module at startup. This is exactly the limitation Tim Deschryver ran into when trying to load an ApplicationInsightsModule at startup that depended on configuration data. If this is your use case, read about how he solved it in his post, Build once deploy to multiple environments.
Another potential drawback is that our AppModule cannot fully initialize until our configuration service returns a promise containing the configuration data. Depending on how long the network request takes, it could cause a noticeable delay in loading our web app for the end user. If you do not need configuration data during the bootstrapping process and you have a landing page that does not depend on any network calls, you can load configuration data when your landing page initializes to decrease initial load time.
Recap
To summarize, environment files are great for compile time configuration, but not for the run-time configuration necessary for the "build once, deploy anywhere" CI/CD model. To solve this, we added a JSON config file, ensured that it would be copied into the dist folder, added a service to retrieve the configuration data, and ensured that it would be fetched as our AppModule initializes.
This approach is easy to implement using what Angular provides out-of-the-box, but (as with anything) we always want to be aware of the drawbacks. The important thing to keep in mind here is that if you need to load a module at startup that depends on configuration data, this approach will not work for you. Happy coding!